Introduction
Cheesy pizza pockets are a delightful spin on the classic pizza we all know and love. These handheld treats offer the same incredible flavors in a convenient format, making them perfect for a quick snack or a hearty lunch. The beauty of pizza pockets lies not just in their simplicity but also in their versatility; you can fill them with your favorite toppings for a personalized touch.
Making cheesy pizza pockets at home is incredibly rewarding, allowing you to craft a crispy crust and a melty, flavorful filling tailored to your preferences. Whether you're feeding a hungry crowd or preparing leftovers for the week, these pockets are sure to satisfy cravings for comfort food. Let’s dive into the ingredients and methods that will transform your kitchen into a pizzeria.
Ingredients
- 2 cups all-purpose flour
The base for the dough, all-purpose flour provides structure and chewiness. It plays a crucial role in achieving a tender yet sturdy crust that can hold your cheesy filling without falling apart. - 1 tsp active dry yeast
Yeast is essential for leavening, helping the dough rise and develop a light texture. This ingredient also contributes to the flavor of the crust, giving it a slight tang that enhances the overall taste. - 1/2 tsp salt
Salt enhances the flavor of the dough while also helping to regulate yeast activity. It is a key component that balances the sweetness of the flour and adds essential seasoning to the overall product. - 3/4 cup warm water
Warm water is needed to activate the yeast, helping it to ferment and create carbon dioxide bubbles that make the dough rise. It’s important that the water is not too hot, as this can kill the yeast. - 1 tbsp olive oil
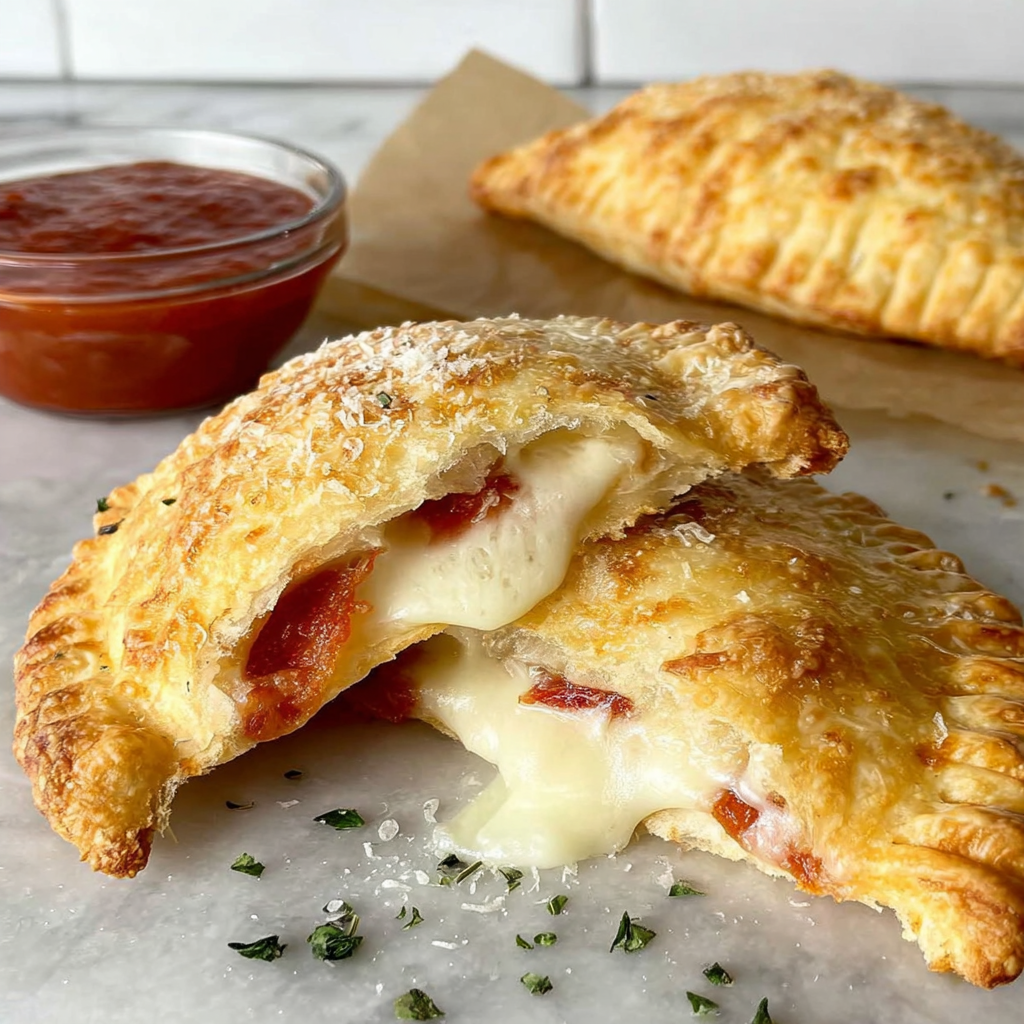
Olive oil adds moisture to the dough and contributes to its richness. It also helps create a more tender crust and can contribute a subtle flavor, enhancing the pizza pocket experience. - 1 cup shredded mozzarella cheese
Mozzarella is the quintessential pizza cheese known for its excellent melting properties. It provides that gooey, stretchy texture that is a hallmark of any pizza creation. - 1/2 cup pepperoni slices
Pepperoni is a classic pizza topping, adding savory spice and robust flavor to your pockets. Its oil renders while baking, contributing to the overall taste and moistness of the filling. - 1/2 cup pizza sauce
Pizza sauce offers the familiar flavors of tomatoes and seasoning, tying the entire filling together. It provides moisture and is vital for a juicy interior that complements the cheese and toppings.
Directions & Preparation
Step 1: Prepare the dough by mixing flour, yeast, salt, and olive oil in a bowl.
This step is crucial for developing the right texture in your pizza pocket. Mixing the dry ingredients first ensures an even distribution of the yeast and salt, which are key for proper rising and flavor. Alternately, use a stand mixer with a dough hook for consistent results.
Step 2: Add warm water gradually and knead the dough for about 8-10 minutes.
Kneading is essential as it develops gluten, which provides structure and elasticity to the dough. Watch for the dough to become smooth and slightly tacky; this is a sign that it’s well-kneaded. Proper kneading prevents a dense crust that won’t rise well.
Step 3: Let the dough rise in a warm location until doubled in size, about 1 hour.
Allowing the dough to rise is key for achieving a fluffy crust. During this time, yeast will ferment and produce carbon dioxide, causing the dough to expand. Choose a warm spot in your kitchen, like near the oven, to speed up this fermentation process.
Step 4: Preheat your oven to 425°F (220°C).
Preheating the oven is important for ensuring that the pizza pockets bake evenly. A hot oven allows the dough to rise quickly and achieve a golden-brown crust. Make sure your oven is fully preheated before you start baking.
Step 5: Roll out the dough into a large rectangle and cut into squares.
Sizing matters here; each square should be large enough to contain your filling without overflowing. Roll the dough to about 1/4 inch thick to achieve that perfect balance between crispy and chewy. It’s okay if they aren’t perfect squares!
Step 6: Place cheese, pepperoni, and a spoonful of pizza sauce onto each square.
Be careful not to overfill to avoid messy pockets—balance is key! Layering the cheese first helps hold other toppings in place, preventing them from slipping out. Ensure your toppings are evenly distributed for consistent flavor in every bite.
Step 7: Fold the squares over to form triangles and press the edges to seal.
Sealing the edges ensures that the filling stays contained while baking. You may wet your fingers with water to help seal if needed. A fork can make decorative crimped edges while reinforcing the seal—fun and functional!
Step 8: Transfer the pizza pockets to a baking sheet lined with parchment.
Parchment paper prevents sticking and makes cleanup easier. Arrange the pockets with some space between them to allow for rising and heat circulation. This step is also great for checking on baking progress.
Step 9: Brush the tops with olive oil for browning and flavor.
Brushing with oil creates a crispy golden crust and adds moisture, enhancing flavor. You might also sprinkle some garlic powder or Italian seasoning for an extra layer of taste—simple but effective!
Step 10: Bake for 15-20 minutes or until golden brown.
Baking times will vary based on oven performance and dough thickness. The goal is a perfectly golden top. Keep an eye on them during the last few minutes to achieve the desired color; overbaking will lead to a dry pocket.
Step 11: Allow to cool slightly before serving with extra pizza sauce.
Cooling prevents burns and allows the filling to set slightly, making them easier to eat. Serving with extra sauce not only looks appetizing but adds a delightful dunking experience, making your pizza pockets even more enjoyable.

Endless Flavor Combinations Await
One of the exciting aspects of cheesy pizza pockets is their incredible versatility. You can mix and match fillings to cater to your taste buds or dietary preferences. Whether you prefer classic options like sausage and mushrooms or creative twists using vegetables and different cheeses, these pockets adapt beautifully. Consider experimenting with gourmet ingredients such as goat cheese, arugula, or even buffalo chicken to elevate your snack game.
Perfect for Game Day or Family Gatherings
Cheesy pizza pockets make for an ideal finger food during casual get-togethers or game days. Their convenience allows guests to enjoy a hearty snack without needing utensils, making socializing effortless. Prepare a large batch ahead of time and keep them warm in the oven, or serve them with a variety of dipping sauces like ranch, marinara, or spicy aioli to please a crowd.
A Fun Activity for Kids and Adults
Making cheesy pizza pockets can be a delightful activity for families. Get your kids involved in the preparation—allowing them to shape their own pockets gives them ownership of the cooking process. This interactive experience is not just about enjoying a tasty snack, but it also promotes creativity and teamwork in the kitchen, making it a fun bonding activity as well.
FAQs
What if my pizza pocket dough feels too sticky?
If your dough is too sticky, gradually add small amounts of flour until it becomes manageable. However, avoid adding too much or the crust may become dense.
How can I adjust the filling for dietary restrictions?
To make a vegetarian version, swap out pepperoni for sautéed vegetables or cheese alternatives. Gluten-free dough can be used to cater to gluten sensitivities, ensuring everyone can enjoy.
What if I want to add fresh veggies to the filling?
If using fresh veggies, consider pre-cooking them slightly to reduce moisture content, which can make the pockets soggy. Ensure they’re chopped small for even distribution.
How can I prevent the edges from opening during baking?
Sealing the edges thoroughly is crucial; if necessary, use a fork to crimp. Also, make sure that there are no air pockets within the filling that can expand and cause the pocket to burst.
Why do my pizza pockets burn on the bottom?
Burning on the bottom could mean your oven temperature is too high or that your baking sheet isn’t suited for even heat. Rotate the baking sheet halfway through for better results.
Is it necessary to let the dough rise overnight?
While overnight rising can deepen flavor, it’s not essential. The dough can rise for an hour; however, a longer rise may lead to a fluffier texture.
Conclusion
Cheesy pizza pockets are more than just a playful twist on pizza—they are a canvas for your culinary creativity. With an achievable recipe and room for experimentation, these pockets can become a staple in your home kitchen.
Whether you're serving them at parties, making them for meal prep, or simply enjoying them on a cozy night in, the comfort and satisfaction they bring will surely impress. So roll up your sleeves, gather your ingredients, and enjoy every cheesy, flavorful bite!
Recipe Card

Savory Cheesy Pizza Pockets for Easy Snacking
Ingredients
- 2 cups all-purpose flour
- 1 tsp active dry yeast
- 1/2 tsp salt
- 3/4 cup warm water
- 1 tbsp olive oil
- 1 cup shredded mozzarella cheese
- 1/2 cup pepperoni slices
- 1/2 cup pizza sauce
Instructions
- Prepare the dough by mixing flour, yeast, salt, and olive oil in a bowl.
- Add warm water gradually and knead the dough for about 8-10 minutes.
- Let the dough rise in a warm location until doubled in size, about 1 hour.
- Preheat your oven to 425°F (220°C).
- Roll out the dough into a large rectangle and cut into squares.
- Place cheese, pepperoni, and a spoonful of pizza sauce onto each square.
- Fold the squares over to form triangles and press the edges to seal.
- Transfer the pizza pockets to a baking sheet lined with parchment.
- Brush the tops with olive oil for browning and flavor.
- Bake for 15-20 minutes or until golden brown.
- Allow to cool slightly before serving with extra pizza sauce.
Notes
Additional serving suggestions: pair with a crisp salad, garlic bread, or roasted seasonal vegetables for balance.
For make-ahead, prep components separately and assemble just before heating to preserve texture.
Taste and adjust with acid (lemon/vinegar) and salt right at the end to wake up flavors.


