Introduction
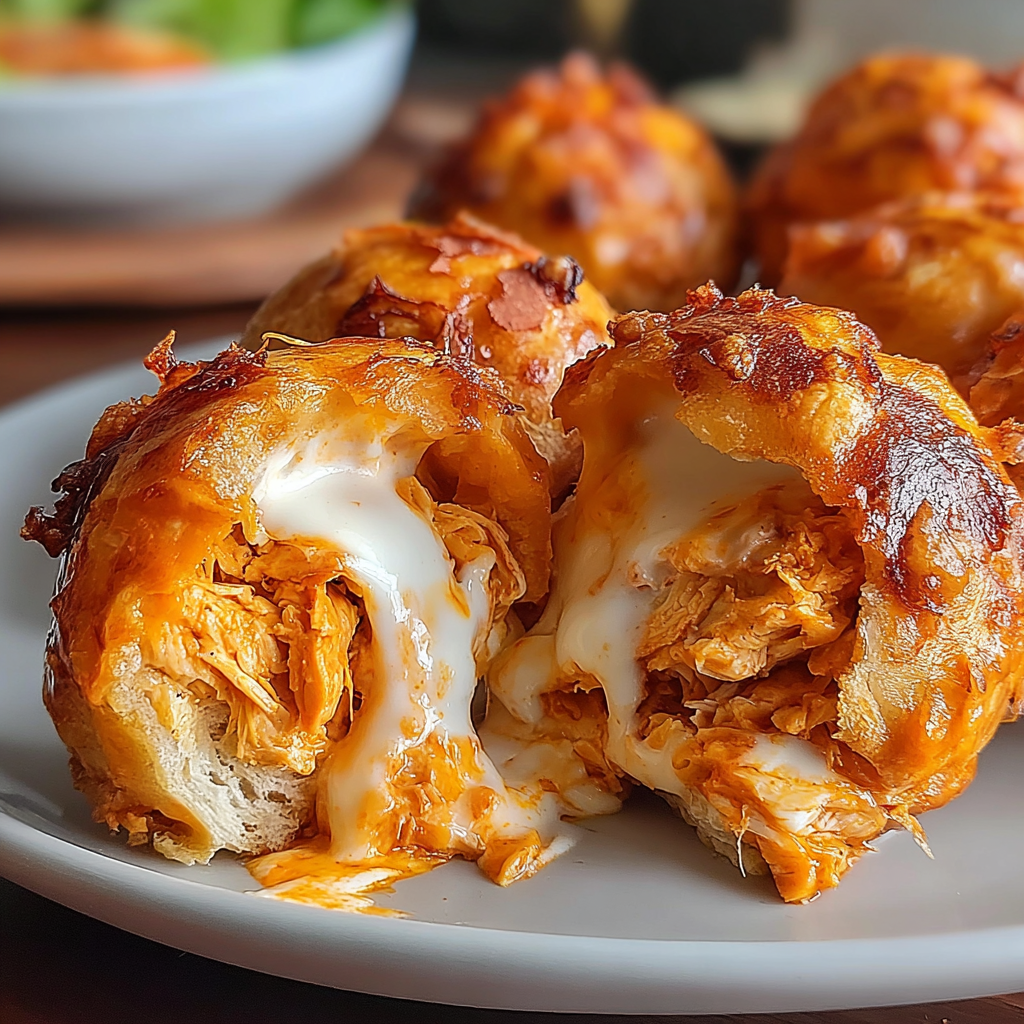
Buffalo Chicken Bombs are an irresistible twist on classic buffalo wings, packed with flavor and easy to prepare. Perfect for game day, appetizers, or parties, these bite-sized treats will become a household favorite. Filled with a spicy chicken mixture and enveloped in a golden, crispy crust, they’re as fun to make as they are to eat.
This recipe not only delivers on taste but also offers versatility. You can adjust the spiciness to suit your personal preferences or add in your favorite cheese for a richer flavor. Whether served with creamy ranch or tangy blue cheese dressing, these bombs are sure to impress.
Ingredients
- 2 cups cooked shredded chicken
Using cooked, shredded chicken saves time and adds a tender texture to the filling. You can use rotisserie chicken or leftover chicken for convenience. - 1/2 cup buffalo sauce
Buffalo sauce provides the signature spicy and tangy flavor. You can adjust the amount based on your preference for heat. - 1 cup cream cheese, softened
Cream cheese adds creaminess and helps bind the filling together, contributing to a luscious texture as it melts during baking. - 1 cup shredded cheddar cheese
Cheddar cheese adds sharpness and a delightful melt, complementing the flavors of the buffalo sauce and chicken. - 1 package refrigerated crescent roll dough
Crescent roll dough serves as the outer layer, providing a flaky and buttery texture that contrasts perfectly with the spicy filling. - 1/4 cup green onions, chopped
Chopped green onions add a fresh, mild onion flavor and a pop of color, enhancing the overall taste and presentation. - 1 egg, beaten (for egg wash)
The beaten egg serves as an egg wash, helping the rolls to achieve a golden, shiny crust as they bake.
Directions & Preparation
Step 1: Preheat your oven to 375°F (190°C).
Preheating the oven is crucial for achieving that perfect crispiness on the outside of your Buffalo Chicken Bombs. It ensures the dough bakes evenly and thoroughly, leading to a golden-brown finish.
Step 2: In a large mixing bowl, combine the shredded chicken, buffalo sauce, cream cheese, and cheddar cheese.
Combining these ingredients creates a flavorful and creamy filling. The buffalo sauce brings the heat while the cream cheese melts to form a smooth texture. Make sure the mixture is well-blended to ensure each bite is delicious.
Step 3: Add in the chopped green onions and mix well.
Incorporating green onions not only adds flavor but also freshness and a bit of crunch. This step enhances the overall profile of the filling, making it more interesting and colorful for your Buffalo Chicken Bombs.
Step 4: Roll out the crescent roll dough and separate it into individual triangles.
Separating the crescent roll dough into triangles allows for easy filling and wrapping. It’s important to lay the dough out flat to avoid tearing, as this will hold the filling securely as it bakes.
Step 5: Place a generous spoonful of the chicken mixture onto each triangle.
Be sure not to overfill the triangles; a spoonful is typically enough. This helps keep the bombs from bursting open during baking, ensuring a neat presentation.
Step 6: Wrap the dough around the filling, pinching the edges to seal.
Sealing the edges is essential to keep the filling from leaking out during baking. Pinching tightly will create a lovely little package that bakes up crisp and golden.
Step 7: Place the filled bombs on a baking sheet lined with parchment paper, seam side down.
Lining the baking sheet with parchment paper prevents sticking and makes cleanup easier. Placing the bombs seam side down ensures they hold together during baking.
Step 8: Brush the tops of the bombs with the beaten egg for a shiny finish.
The egg wash is what gives your Buffalo Chicken Bombs that beautiful golden color and luscious appearance. Skipping this step may result in a less appetizing look.
Step 9: Bake in the preheated oven for 15-20 minutes or until golden brown.
Baking time is crucial; watch for a golden color to indicate they’re cooked through. This step is key to a crunchy exterior while ensuring the filling is heated perfectly.
Step 10: Remove from the oven and let cool slightly before serving.
Allowing the bombs to cool for a few minutes helps set the filling and makes them easier to handle. This also gives the flavors a moment to meld.
Flavor Variations to Try
While the classic buffalo flavor is a hit, consider experimenting with different sauces or herbs in your filling. You could try a barbecue sauce for a smoky twist or even a sweet chili sauce for a milder option. Incorporating spices like garlic powder or paprika in the chicken mixture adds an extra layer of flavor, making these bombs customizable to your taste.
Serving Suggestions for Your Bombs
These Buffalo Chicken Bombs can be served as a standalone appetizer or as part of a larger spread. Pair them with traditional sides like celery sticks and carrot sticks, or create a dipping station with ranch and blue cheese dressings. Presentation matters, so consider arranging them on a platter with colorful vegetables for a vibrant look.
Tips for Perfectly Crispy Bombs
For the crispiest result, make sure the dough is cold before baking. Warm dough can lead to less desirable textures. Additionally, spacing the bombs evenly on the baking sheet allows for proper air circulation, helping them bake uniformly. Always keep an eye on them as baking time can vary based on your oven.
FAQs
What should I do if the filling is too thick?
If your filling feels too thick, consider adding a splash of buffalo sauce or a bit of warm cream cheese to loosen it up. This will make it easier to scoop and wrap.
Can I use leftover rotisserie chicken for this recipe?
Absolutely! Using leftover rotisserie chicken not only saves time but also adds great flavor to your Buffalo Chicken Bombs.
What if my bombs are overcooked?
If your Buffalo Chicken Bombs turn out overcooked, they may be dry. To prevent this, keep an eye on them in the last few minutes of baking.
Can I substitute the crescent rolls with another dough?
Yes! You can use puff pastry or biscuit dough as a substitute for crescent rolls, though baking times may vary.
How can I adjust the spice level in the filling?
You can control the spice by reducing the amount of buffalo sauce or mixing in some cream cheese to tone it down; adding a dash of honey can also help balance the heat.
What can I do if I run out of green onions?
If you find you’re out of green onions, try stirring in some finely chopped parsley or chives for a fresh flavor in your filling.
Conclusion
Buffalo Chicken Bombs are a fantastic addition to any gathering, combining comfort food with a fun presentation. As you play around with flavors and filling options, you'll surely discover your own signature twist on this recipe.
Whether enjoyed at a casual family dinner or while cheering for your favorite sports team, these bombs promise a satisfying, flavorful experience. Enjoy making them and watching your guests devour them!
Recipe Card

Delicious Buffalo Chicken Bombs for Game Day Feasts
Ingredients
- 2 cups cooked shredded chicken
- 1/2 cup buffalo sauce
- 1 cup cream cheese softened
- 1 cup shredded cheddar cheese
- 1 package refrigerated crescent roll dough
- 1/4 cup green onions chopped
- 1 egg beaten (for egg wash)
Instructions
- Preheat your oven to 375°F (190°C).
- In a large mixing bowl, combine the shredded chicken, buffalo sauce, cream cheese, and cheddar cheese.
- Add in the chopped green onions and mix well.
- Roll out the crescent roll dough and separate it into individual triangles.
- Place a generous spoonful of the chicken mixture onto each triangle.
- Wrap the dough around the filling, pinching the edges to seal.
- Place the filled bombs on a baking sheet lined with parchment paper, seam side down.
- Brush the tops of the bombs with the beaten egg for a shiny finish.
- Bake in the preheated oven for 15-20 minutes or until golden brown.
- Remove from the oven and let cool slightly before serving.
Notes
Additional serving suggestions: pair with a crisp salad, garlic bread, or roasted seasonal vegetables for balance.
For make-ahead, prep components separately and assemble just before heating to preserve texture.
Taste and adjust with acid (lemon/vinegar) and salt right at the end to wake up flavors.


