Introduction
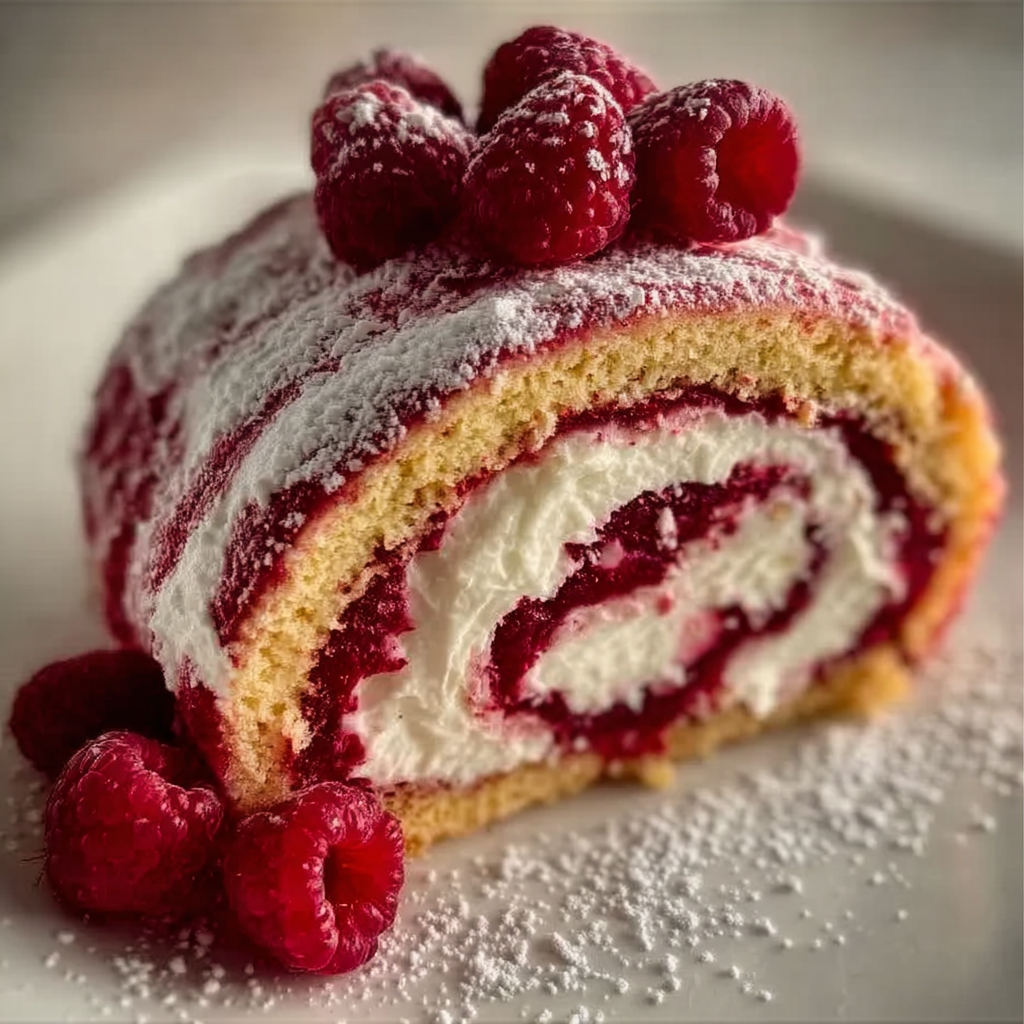
The Raspberry Swirl Christmas Roll is a delightful dessert that captures the essence of the holiday season. With its vibrant red raspberry filling, creamy frosting, and soft, fluffy cake, this roll is not only visually striking but also brimming with seasonal flavors. Perfect for festive gatherings or family dinners, it’s a treat that both adults and kids will adore.
Making a roll cake might sound intimidating, but with the right approach, it can be both enjoyable and rewarding. This recipe will guide you through creating a stunning dessert that is sure to impress your guests. By understanding each step, you can master the art of rolling without cracking and ensure a perfect swirl of raspberry goodness in every slice.
Join me in creating this festive masterpiece that symbolizes holiday cheer. Let's dive into the ingredients and get started on crafting this delightful Raspberry Swirl Cake that will be the centerpiece of your dessert table.
Ingredients
- 3/4 cup all-purpose flour
All-purpose flour provides the structure for the cake, giving it enough strength to hold its shape while being soft and tender. Ensure you measure the flour correctly to avoid a dense texture. - 1 tsp baking powder
Baking powder is a leavening agent that helps the cake rise, creating a light and airy texture. Fresh baking powder will give the best results; check its potency if it's been in your pantry for a while. - 1/4 tsp salt
Salt enhances the overall flavor of the cake and balances the sweetness. It’s a crucial addition that elevates the taste, bringing out the natural flavors of the ingredients. - 2 large eggs
Eggs contribute moisture and act as binders in the cake, helping to create a cohesive structure. They also aid in rising, creating a soft, fluffy texture throughout. - 1/2 cup granulated sugar
Sugar sweetens the cake and contributes to its texture, helping it to remain moist. It also aids in the browning process during baking, creating a appealing golden color. - 1/4 cup milk
Milk adds moisture to the batter, ensuring the cake remains tender. The fat content in milk can also help improve the cake’s flavor and richness. - 1/2 tsp vanilla extract
Vanilla extract elevates the flavor by adding sweetness and warmth. It enhances the overall taste experiences in the background of the raspberry filling. - 1 cup raspberries (fresh or frozen)
Raspberries provide the vibrant swirl and tangy flavor that characterizes this dessert. Fresh raspberries lend a lively burst, while frozen can be used when fresh ones are not available. - 1/4 cup powdered sugar (for filling)
Powdered sugar is used to sweeten the raspberry mixture without adding graininess. It dissolves easily, ensuring a smooth filling. - 1 cup heavy whipping cream
Heavy cream is essential for creating a luxurious frosting. It whips up beautifully, adding a rich and creamy texture that complements the cake. - 1/2 cup powdered sugar (for frosting)
Powdered sugar sweetens the frosting, balancing the richness of the cream. It provides the right consistency for spreading and decorating the cake. - Optional: additional raspberries (for garnish)
Extra raspberries can be used as a beautiful garnish on top of the roll, enhancing its decorative appeal and adding freshness to each slice.
Directions & Preparation
Step 1: Preheat your oven to 375°F (190°C).
Preheating your oven is a crucial step that ensures the cake bakes evenly and at the right temperature. An adequately heated oven promotes proper rising and helps achieve a golden-brown finish on your roll.
Step 2: Grease and line a 15×10-inch jelly roll pan with parchment paper.
Greasing and lining the pan prevents the cake from sticking, allowing for easy removal once baked. Parchment paper also aids in preventing the cake from tearing during the rolling process.
Step 3: In a bowl, whisk together flour, baking powder, and salt.
Combining the dry ingredients helps ensure an even distribution of the leavening agent and salt throughout the flour, preventing any clumps that could affect the texture of the cake.
Step 4: In a separate mixing bowl, beat the eggs and sugar until pale and fluffy.
This step is vital for incorporating air into the batter, which gives the cake its light texture. The mixture should increase in volume and become a light yellow color.
Step 5: Add milk and vanilla extract to the egg mixture and combine well.
Incorporating milk and vanilla at this stage enriches the batter, adding moisture and flavor. Ensure these ingredients are fully combined for a well-balanced cake.
Step 6: Gradually fold the dry ingredients into the wet ingredients until just combined.
Folding gently ensures the batter remains aerated while mixing in the dry ingredients. Overmixing can develop gluten, leading to a denser cake.
Step 7: Pour the batter into the prepared pan, spreading evenly.
Spreading the batter evenly allows for uniform baking and prevents uneven thickness, which can lead to cracking when rolling. Use a spatula to smooth the top.
Step 8: Bake the cake for 12-15 minutes until golden and springy to the touch.
Baking for the right amount of time is crucial to preventing overbaking, which could dry out the cake. It should spring back when lightly pressed in the center.
Step 9: While the cake is baking, prepare a clean, damp kitchen towel sprinkled with powdered sugar.
Sprinkling powdered sugar on the towel prevents sticking and adds sweetness to the crust. Using a damp towel helps retain moisture, making it easier to roll the cake.
Step 10: Immediately upon removing the cake from the oven, invert it onto the prepared towel.
Inverting the cake promptly onto the towel prevents it from cooling in the pan, which could cause it to harden and make rolling difficult. Be careful during this step to avoid tearing.
Step 11: Peel off the parchment paper and carefully roll the cake with the towel.
Rolling the cake while it’s still warm reshapes it, allowing it to hold its form as you fill it later. This method creates a gentle curve, reducing the chance of cracks.
Step 12: Let the rolled cake cool completely, still wrapped in the towel.
Cooling the cake while rolled helps it maintain its shape and prevents cracking when you unroll it later. Allowing sufficient cooling time is important for flavor development.
Step 13: To prepare the raspberry filling, mash raspberries with powdered sugar in a bowl.
Mashing the raspberries releases their juices and flavors, and the sugar balances their tartness. This filling becomes a refreshing contrast to the sweet cake.
Step 14: In another bowl, whip the heavy cream with powdered sugar until stiff peaks form.
Whipping the cream to stiff peaks gives it body and structure, allowing it to hold shape when spread on the cake. This step is essential for a stable frosting.
Step 15: Gently fold the raspberry mixture into the whipped cream until just combined.
This gentle folding ensures that the raspberry flavor is evenly distributed without deflating the whipped cream. Take care not to overmix to keep the fluffiness intact.
Step 16: Unroll the cooled cake carefully, removing the towel.
Unrolling the cake once cooled is delicate work. Be gentle to avoid cracking; the moisture from the towel makes this process easier and less risky.
Step 17: Spread the raspberry cream filling evenly over the unrolled cake.
Distributing the filling evenly ensures every bite is packed with flavor. The sweetness of the cream balances the tartness of the raspberries perfectly.
Step 18: Roll the cake up tightly, starting from one end.
Rolling tightly helps maintain a uniform shape and ensures the filling is snugly enclosed. A loose roll may lead to uneven slices or an insecure filling.
Step 19: Wrap the rolled cake in plastic wrap and refrigerate for at least one hour.
Chilling the cake helps it maintain its shape, making it straightforward to slice when ready. Refrigeration also allows the flavors to meld beautifully.
Step 20: Once chilled, remove from the fridge and gently unwrap.
This step allows you to see the beautiful swirl of raspberry cream, enhancing the visual appeal of your dessert. Handle it carefully to retain the shape.
Step 21: Slice the cake into portions and serve with additional raspberries if desired.
Cutting the cake into even slices allows for easy serving and presentation. A garnish of fresh raspberries visually enhances the dish, inviting eager guests to enjoy.

Crafting the Perfect Swirl
Achieving the perfect raspberry swirl in your Christmas roll is both an art and a science. The balance of flavors in the filling complements the light cake beautifully, while a careful application ensures that each slice reveals an enticing pattern. Remember to be gentle when spreading the filling, as an overly aggressive method may disrupt the cake’s integrity, leading to a less-than-stellar presentation.
Serving Suggestions for Festivity
Present your Raspberry Swirl Christmas Roll on a beautiful platter adorned with fresh raspberries and mint leaves for a festive touch. Pairing this dessert with a dollop of whipped cream or a scoop of vanilla ice cream elevates the experience. You might also consider drizzling a bit of chocolate or tart berry coulis on the plate for an added layer of elegance that makes the dessert show-stopping.
Storing and Enjoying Leftovers
If you happen to have leftovers, store the Raspberry Swirl Christmas Roll tightly wrapped in the fridge. This will keep it fresh for a few days, allowing you to savor its flavors beyond the initial serving. To revive the flavors, consider serving cold slices alongside a cup of coffee or tea, enhancing the taste experience and making each bite just as delightful as the first.
FAQs
What if my cake cracks when rolling?
If your cake cracks while rolling, it may have been undercooked or cooled too long before attempting to roll. Ensure that you roll it while it’s still warm and be gentle with the process.
Can I use different fruits for the filling?
Yes, feel free to experiment with other fruits such as strawberries or blueberries. Just adjust the sugar to accommodate the sweetness or tartness of the chosen fruit.
What if my cream filling is too runny?
If your cream filling is too runny, it could be that it wasn’t whipped enough or the raspberry puree was too liquid. Try adding a bit more powdered sugar to stabilize it.
How do I know when to take the cake out of the oven?
The cake is done when it is golden brown on the edges and springs back when gently pressed in the center. A toothpick inserted in the middle should come out clean.
Can I make this recipe dairy-free?
To make this cake dairy-free, use a dairy-free milk alternative and coconut cream for the frosting. Ensure the other ingredients are also dairy-free.
What sizes can I scale this recipe to?
This recipe can be halved for a smaller roll or doubled for a larger one. Adjust the baking time accordingly as smaller cakes may bake faster and larger ones need more time.
Conclusion
The Raspberry Swirl Christmas Roll is not just a treat but an experience that brings joy to your holiday gatherings. Its vibrant colors and delectable flavors make it a memorable addition to your festive table, leaving a sweet impression on your guests.
By mastering this recipe, you can create a stunning centerpiece dessert that embodies the spirit of celebration. Share this delightful roll with friends and family, creating cherished memories around the table this holiday season.
Recipe Card

Festive Raspberry Swirl Christmas Roll Recipe
Ingredients
- 3/4 cup all-purpose flour
- 1 tsp baking powder
- 1/4 tsp salt
- 2 large eggs
- 1/2 cup granulated sugar
- 1/4 cup milk
- 1/2 tsp vanilla extract
- 1 cup raspberries fresh or frozen
- 1/4 cup powdered sugar for filling
- 1 cup heavy whipping cream
- 1/2 cup powdered sugar for frosting
- Optional: additional raspberries for garnish
Instructions
- Preheat your oven to 375°F (190°C).
- Grease and line a 15x10-inch jelly roll pan with parchment paper.
- In a bowl, whisk together flour, baking powder, and salt.
- In a separate mixing bowl, beat the eggs and sugar until pale and fluffy.
- Add milk and vanilla extract to the egg mixture and combine well.
- Gradually fold the dry ingredients into the wet ingredients until just combined.
- Pour the batter into the prepared pan, spreading evenly.
- Bake the cake for 12-15 minutes until golden and springy to the touch.
- While the cake is baking, prepare a clean, damp kitchen towel sprinkled with powdered sugar.
- Immediately upon removing the cake from the oven, invert it onto the prepared towel.
- Peel off the parchment paper and carefully roll the cake with the towel.
- Let the rolled cake cool completely, still wrapped in the towel.
- To prepare the raspberry filling, mash raspberries with powdered sugar in a bowl.
- In another bowl, whip the heavy cream with powdered sugar until stiff peaks form.
- Gently fold the raspberry mixture into the whipped cream until just combined.
- Unroll the cooled cake carefully, removing the towel.
- Spread the raspberry cream filling evenly over the unrolled cake.
- Roll the cake up tightly, starting from one end.
- Wrap the rolled cake in plastic wrap and refrigerate for at least one hour.
- Once chilled, remove from the fridge and gently unwrap.
- Slice the cake into portions and serve with additional raspberries if desired.