Introduction
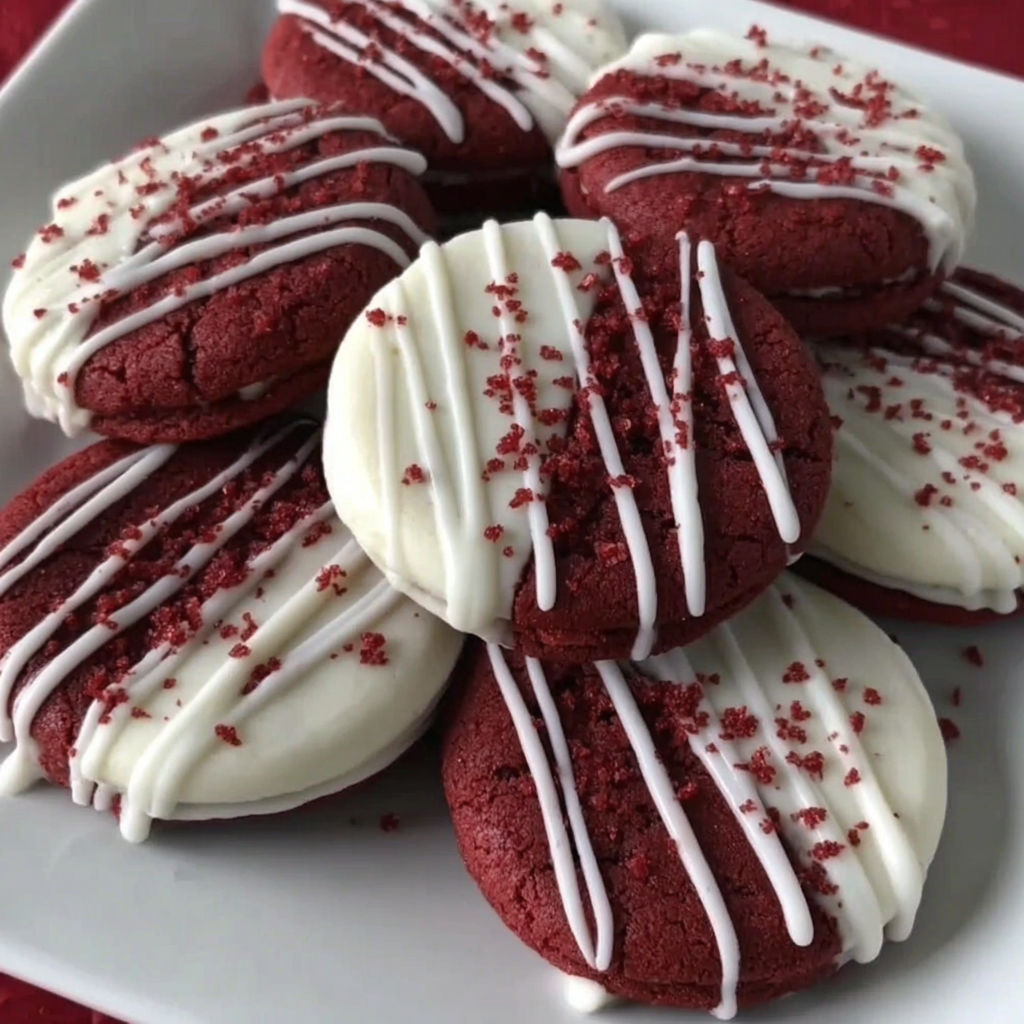
Craving something sweet and visually striking? Red velvet pan-banging cookies deliver both deliciousness and charm. These cookies combine the rich cocoa flavor and appealing red hue characteristic of traditional red velvet cake, making them a delightful treat for any occasion.
Unlike classic cookies, pan-banging techniques create a perfect crisp edge while keeping the center chewy and luscious. This baking method not only enhances the cookie’s texture but also results in an eye-catching appearance that will impress family and friends alike.
Whether you're celebrating a special occasion or simply indulging your sweet tooth, these cookies will not disappoint. Let’s delve into the ingredients and the straightforward process of creating these stunning treats right at home.
Ingredients
- 2 ½ cups all-purpose flour
The foundation of the cookie, all-purpose flour provides structure and stability. Its protein content helps achieve that delightful chewy texture, while the right balance with other ingredients ensures the cookies rise correctly. - 1 tablespoon cocoa powder
Cocoa powder imparts a subtle chocolate flavor to the cookies, complementing the signature red velvet taste. It also contributes to the distinct reddish hue when combined with baking soda. - 1 teaspoon baking soda
Baking soda helps the cookies rise and become puffy while creating that desirable chewy center. It reacts with the acidic component of the cocoa powder and the buttermilk, leading to a perfectly baked cookie. - ½ teaspoon salt
Salt enhances the sweetness of the cookies and balances the flavors effectively. It also intensifies the chocolate notes, ensuring that your cookies are flavorful. - 1 cup unsalted butter, softened
Butter adds richness and moisture to the cookies while contributing to their tender texture. Softened butter helps to incorporate air into the dough, leading to a light, chewy cookie. - 1 ½ cups granulated sugar
Sugar sweetens the cookies, but it also plays a vital role in creating a crisp texture. The amount of sugar affects the spread and how chewy or crispy the final product will be. - 1 large egg
Eggs provide moisture and richness to the cookies, acting as a binder. They also help with the structure, leading to a beautifully shaped cookie that holds together well. - 1 tablespoon red food coloring
The iconic red color comes from food coloring, making these cookies instantly recognizable and festive. This also enhances the visual appeal without impacting the flavor. - 1 teaspoon vanilla extract
Vanilla extract adds a warm, aromatic flavor to the cookies, rounding out the sweetness and enhancing overall taste. It complements the rich chocolate and buttery notes. - 1 cup white chocolate chips
White chocolate chips add pockets of sweetness and creamy texture, contrasting beautifully with the cocoa notes. Their richness elevates the cookie experience.
Directions & Preparation
Step 1: Preheat your oven to 350°F (177°C).
Preheating the oven ensures an even baking temperature from the start, critical for consistent cookie textures. This step allows the butter to melt at the right rate and the dough to cook evenly, producing the desired chewy center.
Step 2: In a bowl, whisk together the flour, cocoa powder, baking soda, and salt. Set aside.
Whisking these dry ingredients together ensures they are evenly distributed throughout the cookie dough. This step prevents clumping and guarantees that the leavening agents work effectively to give the cookies the right rise.
Step 3: In a separate large bowl, cream the softened butter and granulated sugar until light and fluffy. This should take about 3-4 minutes.
Creaming the butter and sugar properly introduces air into the mixture, crucial for light and fluffy cookies. The texture of your mixture should become pale and fluffy, indicating it's well-aerated, which contributes to the overall structure of the baked cookies.
Step 4: Add the egg, red food coloring, and vanilla extract to the creamed mixture. Mix well until fully incorporated.
Incorporating the egg adds moisture and promotes binding in the dough, while the food coloring gives that signature red hue. Mix until just combined to avoid over-developing the gluten which could lead to a tougher cookie.
Step 5: Gradually add the dry ingredients to the wet ingredients, mixing until just combined. Fold in the white chocolate chips.
This step is crucial as overmixing can result in tough cookies. Ensure to stop mixing as soon as the flour is fully incorporated to keep the cookies tender. The addition of white chocolate chips will add delightful sweetness and creamy bites.
Step 6: Scoop the dough onto a baking sheet lined with parchment paper, spacing them about 2 inches apart.
Proper spacing is vital to allow for spreading while baking. This ensures that the cookies have room to expand and develop their shape without merging into one another.
Step 7: Lightly bang the baking sheet on the counter to flatten the dough slightly before placing them in the oven.
This unique pan-banging technique encourages a crisper exterior and a chewy interior. The force helps the cookies to spread just enough for that perfect texture while allowing for an appealing height.
Step 8: Bake in the preheated oven for 12-15 minutes until the edges are crisp but the centers remain soft.
Baking time can vary based on oven type and cookie size, so keeping an eye on them is essential. You want a perfect golden-brown edge, while the centers should slightly dome, ensuring they maintain their delicious chewiness.
Step 9: Remove from the oven and let the cookies cool on the baking sheet for 5 minutes before transferring them to a wire rack to cool completely.
Cooling on the baking sheet allows the cookies to firm up a bit more before being transferred. This precaution prevents them from breaking or losing their shape, allowing them to develop the perfect texture.

The Effect of Red Food Coloring
Red food coloring is a hallmark of the red velvet concept, providing not only its vibrant color but also a visually enticing appeal that reflects festive celebrations. This infusion of color emphasizes the rich history of red velvet recipes, originating from cocoa-based desserts that were intended to stand out on any dessert table.
Why White Chocolate Chips Work
Incorporating white chocolate chips into these cookies adds an unexpected twist, giving a creamy contrast to the dark cocoa flavor. They melt beautifully within the cookies while retaining their shape, allowing for pockets of sweetness that complement the overall flavor profile and contribute to a delightful texture.
Pan-Banging Technique Explained
The pan-banging technique is a straightforward yet effective method to achieve a perfect cookie. It encourages the dough to spread out while forming that delightful lid; resulting in a crispy outer layer and a soft, chewy middle. This technique can be applied to various cookie recipes, enhancing texture and even flavor.
FAQs
What if my dough is too thin?
If your dough appears too thin, try chilling it in the refrigerator for about 30 minutes. This helps solidify the butter, enabling the cookies to hold their shape better while baking.
Can I substitute white chocolate chips with dark chocolate?
Yes, dark chocolate chips can be used as a substitute for white chocolate if you desire a richer cocoa flavor. Adjust the sweetness of your dough slightly if necessary.
Why did my cookies end up too hard?
Cookies that become too hard may have been overbaked, or the dough might have been overmixed. Make sure to keep an eye on baking time and mix until just combined.
How can I intensify the chocolate flavor?
To deepen the chocolate flavor, consider increasing the amount of cocoa powder or adding a few tablespoons of finely grated dark chocolate into the dough.
Can I make this recipe gluten-free?
While this specific recipe is not gluten-free, you can experiment with a gluten-free all-purpose flour blend to create a similar texture, keeping in mind that results may vary.
What can I do if my cookies spread too much?
If cookies spread excessively, ensure you're properly measuring your flour and consider chilling the dough before baking. This can help maintain the desired cookie shape.
Conclusion
Red velvet pan-banging cookies are not just treats; they're an experience. With their lovely red hue and delightful combination of flavors and textures, they’re sure to elevate any dessert tray.
Don’t hesitate to get creative with this recipe—add nuts, tweak the chocolate balance, or even incorporate a hint of espresso for a mocha twist. Embrace the joy of baking, and let these cookies be a delicious centerpiece of your next gathering.
Recipe Card
Pinterest Image
\n\n

Irresistible Red Velvet Pan-Banging Cookies
Ingredients
- 2 ½ cups all-purpose flour
- 1 tablespoon cocoa powder
- 1 teaspoon baking soda
- ½ teaspoon salt
- 1 cup unsalted butter softened
- 1 ½ cups granulated sugar
- 1 large egg
- 1 tablespoon red food coloring
- 1 teaspoon vanilla extract
- 1 cup white chocolate chips
Instructions
- Preheat your oven to 350°F (177°C).
- In a bowl, whisk together the flour, cocoa powder, baking soda, and salt. Set aside.
- In a separate large bowl, cream the softened butter and granulated sugar until light and fluffy. This should take about 3-4 minutes.
- Add the egg, red food coloring, and vanilla extract to the creamed mixture. Mix well until fully incorporated.
- Gradually add the dry ingredients to the wet ingredients, mixing until just combined. Fold in the white chocolate chips.
- Scoop the dough onto a baking sheet lined with parchment paper, spacing them about 2 inches apart.
- Lightly bang the baking sheet on the counter to flatten the dough slightly before placing them in the oven.
- Bake in the preheated oven for 12-15 minutes until the edges are crisp but the centers remain soft.
- Remove from the oven and let the cookies cool on the baking sheet for 5 minutes before transferring them to a wire rack to cool completely.
Notes
Additional serving suggestions: pair with a crisp salad, garlic bread, or roasted seasonal vegetables for balance.
For make-ahead, prep components separately and assemble just before heating to preserve texture.
Taste and adjust with acid (lemon/vinegar) and salt right at the end to wake up flavors.


