Introduction
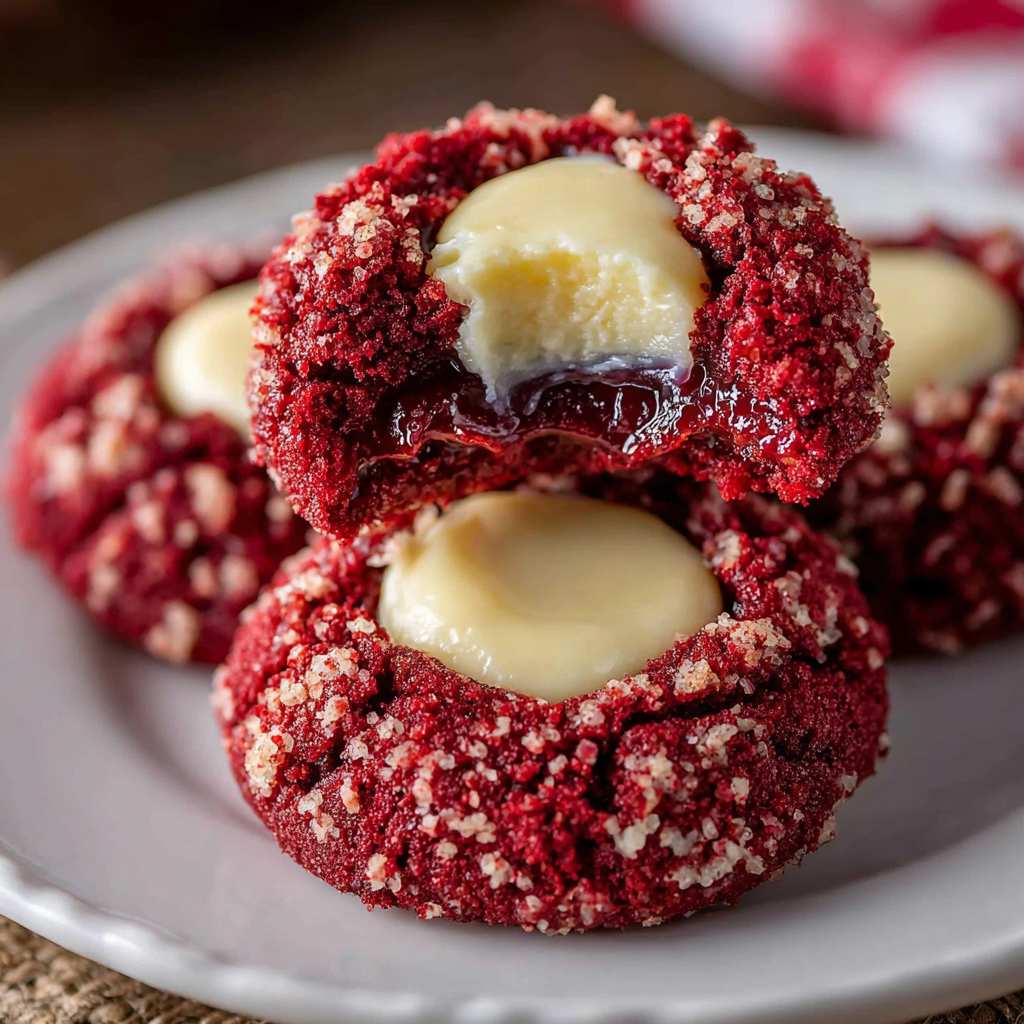
Red velvet cookies are a delightful twist on the traditional thumbprint variation, offering a rich flavor and stunning color that brighten any dessert table. Their soft and chewy texture makes them an irresistible treat for special occasions or simply to satisfy your sweet tooth.
These cookies, with their vibrant red hue and creamy filling, are sure to impress anyone who tries them. Not only are they visually appealing, but they also blend the classic flavors of cocoa and vanilla, resulting in a heavenly combination that you won’t want to miss.
Ingredients
- 2 cups all-purpose flour
All-purpose flour gives these cookies their structure and contributes to the chewy texture. It forms the base of the dough, allowing the cookies to hold their shape while ensuring they aren't too dense. - 1 cup granulated sugar
Granulated sugar not only sweetens the cookies but also helps to create a tender crumb. The sugar dissolves during baking, ensuring a soft texture and a slight crunch on the edges. - 1/2 cup unsalted butter, softened
Butter adds richness and moisture to the cookies, enhancing their flavor and contributing to a chewy texture. Softened butter blends easily with the sugars, creating a light and fluffy base. - 1 large egg
The egg acts as a binder in the dough, helping to hold the ingredients together. Additionally, it adds moisture and richness, which are essential for achieving the desired chewy consistency. - 1 tablespoon red food coloring
Red food coloring is what makes these cookies visually striking. It adds a vibrant hue that enhances the appearance and aligns with the classic red velvet theme. - 1 tablespoon cocoa powder
Cocoa powder provides a subtle chocolate flavor without overpowering the red velvet essence. It balances the sweetness and adds depth to the cookie's flavor profile. - 1 teaspoon vanilla extract
Vanilla extract contributes warm, sweet notes that enhance the overall flavor of the cookies. It complements the chocolate flavor from the cocoa powder, creating a well-rounded taste. - 1/2 teaspoon baking powder
Baking powder is a leavening agent that helps the cookies rise slightly. This ensures they maintain a soft and chewy texture instead of becoming flat or overly dense. - 1/4 teaspoon salt
Salt enhances the flavors of the other ingredients and balances the sweetness of the sugar. It helps to bring out the richness of the butter and the depth of the cocoa powder. - 1/2 cup cream cheese, softened
Cream cheese provides a tangy and creamy filling for the thumbprint center. It adds a contrasting smooth texture to the chewy cookies and complements their flavors beautifully. - 1/4 cup powdered sugar
Powdered sugar sweetens the cream cheese filling while also providing a smooth texture. It dissolves easily, ensuring your filling is not gritty but delightfully creamy. - 1/2 teaspoon vanilla extract (for filling)
The additional vanilla extract in the cream cheese filling enhances its flavor, ensuring it complements the cookies perfectly and adds depth to the overall taste experience.
Directions & Preparation
Step 1: Preheat your oven to 350°F (180°C).
Preheating the oven is crucial as it ensures that the cookies bake evenly. An oven that's at the right temperature helps the cookies rise and sets the structure properly, preventing them from spreading too much.
Step 2: In a large bowl, cream together softened butter and granulated sugar until light and fluffy.
Creaming the butter and sugar together is important for incorporating air into the dough, resulting in a light texture. Aim for a pale and fluffy mixture, which usually takes about 3-5 minutes of mixing.
Step 3: Add in the egg, red food coloring, vanilla extract, and cocoa powder, mixing until well combined.
Incorporating the egg and food coloring at this stage adds moisture and comprises the crucial red velvet aspect. Ensure everything is well integrated, but be careful not to overmix, which could affect the cookie texture.
Step 4: In another bowl, whisk together the flour, baking powder, and salt.
Whisking the dry ingredients separately ensures an even distribution of the baking powder and salt, preventing any pockets of leavening agent in the cookies. This step contributes to a uniform texture and rise.
Step 5: Gradually mix the dry ingredients into the wet ingredients.
Adding the flour mixture gradually allows for controlled incorporation, which helps prevent overmixing. Stop as soon as the flour is fully combined to maintain the cookie's softness.
Step 6: Scoop the dough and roll it into balls, placing them on parchment-lined baking sheets.
Rolling the dough into uniform balls ensures even baking and a consistent shape for the cookies. Use a medium-sized cookie scoop for best results; spacing them apart is essential for proper spreading.
Step 7: Use your thumb to create a small indentation in the center of each ball.
Creating an indentation is crucial as it provides the perfect space for the cream cheese filling. This step ensures that the cookies hold their shape while also enabling the filling to sit nicely in the cookies.
Step 8: Bake for 10-12 minutes or until edges are set but the centers remain soft.
The baking time is essential for achieving the right texture. Baking until just set helps guarantee soft, chewy centers; keep an eye on them to avoid overbaking, which may lead to dryness.
Step 9: While the cookies cool, prepare the cream cheese filling by mixing softened cream cheese, powdered sugar, and vanilla extract together until smooth.
Mixing the filling while the cookies cool allows the flavors to meld together. Ensure you achieve a smooth consistency; lumps in the filling can detract from the overall enjoyment of the cookies.
Step 10: Fill each cookie indentation with the cream cheese mixture.
Filling the indentations after cooling ensures that the cream cheese doesn't melt into the cookies. Use a small piping bag or a spoon for this step; it adds a visual delight and a flavorful surprise in every bite.
Step 11: Let the cookies set for at least 30 minutes before serving.
Allowing the cookies to set will help the cream cheese filling firm up slightly, making them easier to handle. It's also an excellent time for the flavors to blend together, enhancing the overall taste experience.

The Charm of Red Velvet Flavors
Red velvet cookies beautifully marry cocoa and a touch of vanilla, creating a flavor profile that is both unique and delicious. The rich hue pairs wonderfully with the cream cheese filling, making every bite a delightful experience. Each cookie combines nostalgia with a modern twist, making it a perfect treat for holidays, birthdays, or any gathering where you want to impress your guests.
How to Achieve Impeccable Chewiness
The secret to the soft and chewy texture of these red velvet thumbprint cookies lies in the butter and proper mixing technique. Creaming the butter and sugar well aerates the mixture, creating a tender crumb. Additionally, the balance of baking powder and not overbaking ensures the cookies retain their chewy quality, which is crucial for that perfect bite.
A Versatile Cream Cheese Filling
The cream cheese filling can be customized to suit your taste preferences. For a hint of citrus, try adding some lemon zest, or for extra sweetness, consider mixing in a bit of chocolate or almond extract. This versatility makes the filling not only a delicious complement to the cookies but also allows you to make variations that suit any occasion or celebration.
FAQs
What to do if my dough is too thick?
If your dough is too thick to handle, it may need a touch more moisture. Gradually add a little milk, a teaspoon at a time, until the desired consistency is achieved.
How can I adjust the sweetness of the filling?
To alter the sweetness of the cream cheese filling, adjust the amount of powdered sugar to your taste. Start with less sugar and gradually add more until you reach your preferred sweetness.
Why are my cookies spreading too much while baking?
Excessive spreading can occur if the dough was too warm or if there was not enough flour. Ensure your butter is softened properly but not melted and that you measured everything accurately.
Can I use Greek yogurt instead of cream cheese?
Yes, Greek yogurt can be used as a substitute for cream cheese, but keep in mind this will alter the flavor and texture slightly. The filling may be tangier and less creamy.
What if my cookies are too dry?
Dry cookies are usually a result of overbaking. Keep a close eye on them, and take them out of the oven as soon as the edges appear set while the centers are still soft.
Can I double the recipe for a larger batch?
Doubling the recipe can be done easily. Just make sure to use appropriately sized mixing bowls to accommodate larger quantities and adjust baking times accordingly if using multiple trays.
Conclusion
Soft and chewy red velvet thumbprint cookies are a delightful addition to any dessert spread, offering a unique flavor and eye-catching color. They are not only pleasing to the eye but also a delight to the palate.
With a creamy filling and perfectly chewy texture, these cookies are sure to become a favorite in your home. Embrace the joy of baking and share these treats with loved ones for a truly lovely experience.
Recipe Card
Pinterest Image
\n\n

Soft and Chewy Red Velvet Thumbprint Cookies
Ingredients
- 2 cups all-purpose flour
- 1 cup granulated sugar
- 1/2 cup unsalted butter softened
- 1 large egg
- 1 tablespoon red food coloring
- 1 tablespoon cocoa powder
- 1 teaspoon vanilla extract
- 1/2 teaspoon baking powder
- 1/4 teaspoon salt
- 1/2 cup cream cheese softened
- 1/4 cup powdered sugar
- 1/2 teaspoon vanilla extract for filling
Instructions
- Preheat your oven to 350°F (180°C).
- In a large bowl, cream together softened butter and granulated sugar until light and fluffy.
- Add in the egg, red food coloring, vanilla extract, and cocoa powder, mixing until well combined.
- In another bowl, whisk together the flour, baking powder, and salt.
- Gradually mix the dry ingredients into the wet ingredients.
- Scoop the dough and roll it into balls, placing them on parchment-lined baking sheets.
- Use your thumb to create a small indentation in the center of each ball.
- Bake for 10-12 minutes or until edges are set but the centers remain soft.
- While the cookies cool, prepare the cream cheese filling by mixing softened cream cheese, powdered sugar, and vanilla extract together until smooth.
- Fill each cookie indentation with the cream cheese mixture.
- Let the cookies set for at least 30 minutes before serving.
Notes
Additional serving suggestions: pair with a crisp salad, garlic bread, or roasted seasonal vegetables for balance.
For make-ahead, prep components separately and assemble just before heating to preserve texture.
Taste and adjust with acid (lemon/vinegar) and salt right at the end to wake up flavors.


